"Reclaiming Homemade in a Small Space"

Tuesday, January 31, 2012

A Study in Gnocchi

My heritage is decidedly English/Scottish.  Type in any of the surnames of my ancestors and you will find they come from the British Isles.  There really is no deviation from that on either side of my family, but please don't ask me to prepare a Yorkshire pudding or haggis.  I have NO idea (though it might be a fun experience).  The cuisine of my ancestors is not my food.  If you ask me what cultural cuisine I identify with (besides Southern American), it is Italian. 

I grew up eating the Italian/American fare of lasagna and spaghetti.  I know of at least two birthdays in my teens spent at Italian/American restaurant chains.  Now, growing up in the South, authenticity wasn't found at those places, but the love for the food grew out of those experiences.  As I got older, I found myself trying to find authentic Italian food.  (My husband bought me a cookbook one year for Christmas that was devoted to authenticity in the recipes. )  I discovered things you'd never find at Olive Garden.  Risotto was one, polenta was another and then there was gnocchi. 
pumpkin gnocchi

Gnocchi, the Italian dumpling, was something that I would just have to try.  I discovered some use potatoes, some ricotta, some have different flavorings but they all use flour and eggs.  I was pouring through the cookbook that Matt got me and found a recipe for butternut gnocchi.  I LOVE dumplings so I though I would give it a try.  My first attempt was a miserable failure.  I didn't give up though and tried again.  Today's blog will contrast two different recipes for pumpkin gnocchi.

I found numerous sources, I thought I'd begin with Emeril Lagasse's recipe for Pumpkin Gnocchi .  I first tried this recipe back in October.  Over all, I found the recipe easy to follow, but it was the more time consuming of the two.  You boil potatoes first, let them cool, peel them and run them through a ricer.  I didn't have a ricer so I used a food mill on the largest setting.  It did the job well.  When I rolled out the dough, I found it very, very sticky.  I added more flour and found that after the gnocchi were boiled, they were fairly gummy.  I'm going to chalk this up to inexperience.  After the boil in salted water, they were fried in butter and sage.  Despite the texture, the pumpkin flavor came through and they tasted delicious.  I think the biggest flaw was the sage/butter sauce....there was WAY too much butter.  It was superfluous.  Next time, I will cut the butter in half and there will still be plenty of butter for the dish. 

The next recipe I tried was one from Simply Recipes.  It used a cup of pumpkin and a cup of ricotta.

Convinced that the gummy texture in my previous attempt was from too much moisture, I mixed the pumpkin and ricotta together and let them drain in a colander.  That removed about 1 T. of liquid.  This was the only step that I added to the excellent directions and pictures on this recipe's site.   (Oh...and I did use 1/2 c. of whole wheat flour...I just can't leave recipes alone.)  The gnocchi rolled out better and cooked better as well.  I found these were light and pillowy and delicious.  I didn't find the pumpkin flavor as strong as Emeril's but they were fabulous otherwise.  The texture was such a bonus that I didn't care. 

Gnocchi are time consuming.  I would say they take at least an hour of dedicated work.  It is a process that I can't leave once started, but the effort is worth it.  Plain gnocchi can be used like pasta or polenta with a sauce poured over them.  My family likes the pumpkin gnocchi as a side dish to pork or chicken.  Take some time soon to make these, you will be so glad you did.

Friday, January 27, 2012

I'm BAAAACK ....and with acorn squash to boot!


Most of you know that our laptop crashed and burned two weeks ago.  It happened right smack in the middle of a prime blogging project....the 20 lb. turkey and it's many uses.  The laptop was dead....really dead.  Wouldn't start....wouldn't do anything....My dear husband didn't give up and after two weeks, he finally got our laptop up and running!  I am so thankful....at first we thought we had lost ALL our data, including Christmas pictures.  As it turns out, I did lose a few original recipes, but fortunately I can remember most of those.  The above is an original, though it is heavily inspired from other sources. 

I am sure that many of you (like me) made resolutions NOT to overindulge (too much) in 2012.  We start cutting back on fat and calories and begin exercising.  Here is a recipe that is low in fat and calories, full of nutrients and (insert fanfare music here!) delicious!  Meet the acorn squash.
You should find them plentiful this time of year, they are a variety of winter squash.  One cup of baked acorn squash has 9 g of fiber, 18% of your vitamin A, 37% of vitamin C, 9% calcium, and 11% iron and as much potassium as a banana.  They also have a low glycemic index, which means you stay full longer.

The biggest challenge with the acorn squash is the shape.  The deep ridges make peeling before cooking nearly impossible.  Like most winter squashes, their flesh is hard and needs significant cooking before you can eat it.  The best way I know of to cook the acorn squash is to cut it in half and bake it.  After the flesh is nice and soft, I flavor with brown sugar, butter and pumpkin pie spice.

Spiced Acorn Squash:
(four servings)
1 acorn squash
2 T. butter
4 t. brown sugar
1 to 2 t. pumpkin pie spice
(1/2 t. cayenne pepper)
salt to taste

Cut the squash in half and scoop out the seeds.

Place, flesh side down in a rectangular baking dish.  Fill the dish with a half an inch of water.  Cover tightly with aluminum foil.

Bake in a 350 degree oven for 45 minutes or until the squash is easily punctured with a fork.  At this point, you have nearly a blank canvass to work with....you can put nearly any flavor profile on this.
I like to use the sweet of brown sugar and a hint of pumpkin pie spice to get my kids to eat it and love it. Crank up the oven to 450 at this point.  Now, I cut each half again so that I have 4 pieces of squash. Dump out the water that you roasted the squash in and place the fourths in the pan.  Rub 1/2 T. of butter on each fourth, leaving a nice pool of butter in the hollow in the center.

Sprinkle each quarter with 1 t. of brown sugar and 1/4 to 1/2 t. of pumpkin pie spice (depending on your taste) and a wee bit of salt.  If you are like many who like it hot, add some cayenne pepper to the mix.
Place back in the oven for 10 to 15 min or until the edges have firmed up and browned just a little bit.  Serve immediately. To eat this, just scoop out the buttery, creamy squash and leave the peel behind.  This is a perfect complement to roast chicken, turkey or pork.  It can also be the main course of a vegetarian meal. 

Wednesday, January 18, 2012

Technology...don't you love it???

Modern technology is wonderful. I love the fact that I can communicate with people all over the country (and world) through the convience of my laptop. I can share with you my love of cooking. But alas....our laptop....is dying a slow death. I am beside myself that our Christmas morning pictures may be gone. That might be the biggest tragedy.

A lesser tragedy is that I have so many blog ideas that I am not able to share with you. My Internet access has been through our iPad and though better than no Internet, I can't upload pics. Typing is tedious at best. I still would share with you some of the things that will be coming as soon as I can really blog.

How many meals we got from a 20 lb. turkey...and not just your typical leftovers.

Meatballs

A vegetarian original...

Chicken and dumplings

SOUP!

Well, until we meet again. Or until I get a new laptop. Happy cooking!

Tuesday, January 10, 2012

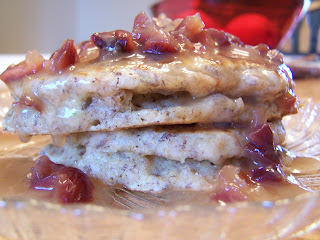
Delicious High Fiber Buttermilk Pancakes with Cran-Orange Syrup: Guilt-Free Dining!

My husband and I have been on a journey to lose weight since May and journey is the right term.  There have times we've made great strides and then came "The Eating Season"...weight-loss was put on hold and we strove to not gain many pounds while I made truffles , toffee , orange balls , etc....  Our main method of losing weight is LoseIt.com, a calorie counting site.  We keep track of our calorie "budget", if you will, each day.  Over the weeks and months of doing this, we've dubbed certain foods as "expensive"....or foods that are high in calories.

A few days after the New Year, I announced I was making pancakes for dinner.  Normally, this comes as welcome news to the fam since we LOVE breakfast for dinner.  Real maple syrup and melting butter sliding down hot pancakes, doesn't it make you drool? But this time, Matt groaned and said, "Pancakes are expensive!"

Now, it really isn't the pancakes themselves that are so "expensive" or high in calories.  It is the syrup.  A 1/4 cup serving of syrup is 200 calories!!!!  And who sticks to that teeny-tiny 1/4 c. over a meal of pancakes????  So I got to thinking about what I could do to improve my pancake recipe and lower the calories.   The classic combination of cranberries and oranges was fresh on my mind after Christmas, so I decided to replace the typical calorie laden maple syrup with an orange juice based syrup.

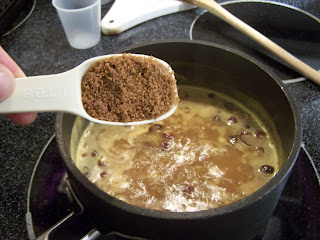
I took my knowledge of my cranberry compote and applied it in a little different direction.  Since this needed to be a year-round meal, I stayed away from fresh cranberries which might be hard to find in summer.  Dried sweetened cranberries seemed to be the logical choice.  I cooked them in some orange juice, a little brown sugar and cinnamon then thickened it with some cornstarch.  SUCCESS!  Not only was it delicious, it was much lower in calories than maple syrup.  It only has 59 calories per 1/4 cup instead of a whopping 200.

The pancakes the syrup was served on were heavily influenced by The Joy of Cooking and Alton Brown's pancakes.  Basically, I increased the fiber by adding milled flax seed and subbing half of the all-purpose flour with whole wheat flour.

Cran-Orange Syrup:
1 3/4 c. orange juice  plus 2 T. orange juice, divided
1/4 c. water
1/2 c. dried cranberries, roughly chopped
2 t. brown sugar
1/8 t. cinnamon
pinch of salt
1 T. cornstarch

In a small saucepan, combine cranberries and orange juice.

Bring to a boil, then add the cinnamon and brown sugar.

Lower the heat and let it simmer.  During this time, the cranberries will be reconstituting.  In a small mixing bowl, combine cornstarch and reserved orange juice with a whisk.  This is called a slurry.
 Next step is to pour the slurry into the saucepan.  It will slowly thicken as it simmers.  Just keep it on low heat while you make the pancakes.

High-Fiber Buttermilk Pancakes:
1 c. all-purpose flour
1 c. whole wheat flour
1/2 c.  milled flax seed
2 t. sugar
1 1/2 t. baking powder
1 t. baking soda
1 t. salt
2 eggs
2 c. buttermilk (or more if you want a thinner batter)
1/4 c. melted butter

In a large mixing bowl, combine both flours, flax seed, sugar, baking powder, baking soda and salt.

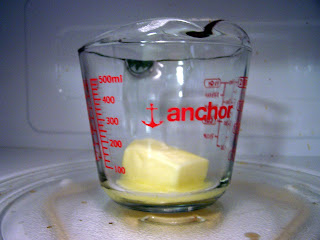
Mix well.  Now turn your attention to the wet ingredients.  I follow Alton Brown's way of combining the wet ingredients.  First, melt the butter. I use a small 1 c. Pyrex measuring cup.
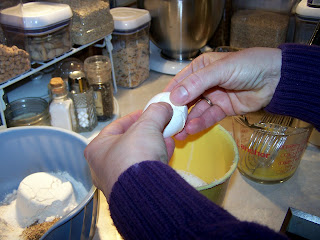
Then, measure out your buttermilk in a medium bowl.  Now, it is time to separate eggs.  What?  Separate eggs you say?  Why?  I first saw Alton Brown do this and it makes a lot of sense to me.  He puts the egg yolk and butter together then whisks the buttermilk and egg whites together.  I like this because when you add the yolk to the warm butter it prevents all the butter from clumping back up when it is added to the colder buttermilk.  So, separate your eggs...putting the yolks in the butter and the whites in the buttermilk.  Here is the way I separate eggs. First, I crack the egg and hold it over the container that will be receiving the egg white.  I gently pull apart the egg shell and pull my right hand under to catch the yolk in one half of the egg shell.  Most of the white will drop, then I gently toss the egg back and forth in each part of the egg shell until all the white is separated. 


Thanks to my daughter, Emma for taking pics for me!

Then, I put the egg yolk in the butter.
Repeat with the other egg.  Now, whisk both the yolk and butter together.  Do the same with the buttermilk and egg whites.  Add the egg yolk/butter to the buttermilk/egg whites.  (NOTE: I prefer my batter thick.  If you like your batter thinner, add 1/2 c. of buttermilk at this time.)

Mix these well.  Preheat your griddle to 350 degrees.  If you are using a regular frying pan, heat your pan over medium high heat until butter dropped on it sizzles immediately but doesn't turn brown right away.  If the butter melts slowly, it isn't hot enough; if the butter almost immediately turns brown, it is too hot.

It is time to add your wet ingredients to the dry.  Do this quickly and DO NOT over mix.  If you do, your pancakes will be tough.  It is okay to leave a few dry patches...they will cook out.

If your pan/griddle is hot it is time to scoop 1/4 cupfuls onto it.  Since I like my batter thicker it requires me to spread out the batter with the top of my 1/4 c. to flatten it.
Cooking pancakes can be tricky.  When do you flip them?  I know mine are ready to flip when the edges no longer look wet.  They will be dull and the tops of the pancakes will have bubbles on them.
This one is almost ready to flip.  I also check underneath with a spatula to see if a deep golden brown color has been achieved.  After flipping you will know when they are done when the sides of the pancake look dry.
Not quite ready.....

Now it is ready!!!
Serve these up immediately with your warm cran-orange syrup.  No guilt here for sure!  And when you want to have a splurge-y kind of meal, these pancakes can stand up to the sweet maple syrup as well. 
For one pancake:  144 calories, 6.4 g. fat, 3.6 g. fiber