"Reclaiming Homemade in a Small Space"

Wednesday, April 18, 2012

Reclaiming Sour Cream

Let's reclaim sour cream, shall we?

You might be thinking, "Why would I want to make my own sour cream?"  It is readily available in the grocery stores for not a whole lot of cash.  There are a few reasons why you might consider making your own.   One reason is many commercial dairies add guar gum or gelatine to make the sour cream even thicker or things to make it last longer.  Or, you might have bought heavy cream for a recipe and have 1/2 c. left over.  It just sits in your fridge because you aren't sure what to do with it. 

I started making my own sour cream on a regular basis when I started buying pasteurized, non-homogenized milk.  The cream rises to the top and then I can skim it off and make sour cream. This is not only tasier!, but also eco-friendlier.  I'm not wasting money on packaging or filling up landfills with plastic containers.  (Food for thought, it still takes 5 years for a cardboard milk container to biodegrade.)  Here's a bonus too:  it is SUPER easy to make!

If the thought of souring your own cream just seems a little gross, I ask you, how do you think commercial dairies do it?  We get separated from the process and don't realize that what is done in a huge factory can be done in your own kitchen.  Our ancestors made sour cream by letting the fresh raw cream just sit out until it reach the desired degree of sourness/thickness. Here is how eHow.com describes the modern, commercial sour cream development.

"The pasteurized cream is inoculated with bacteria that come from lactic acid. The inoculated cream is allowed to ripen for 14 to 16 hours at 72 degrees F. During this time, the bacteria grows, fermenting the cream in the process. This process is also called "souring," which is how sour cream got its name. Souring makes the cream thick and sour. Then the cream is chilled for 12 to 48 hours. Once the cream is soured to the desired level, it is pasteurized to kill the bacteria.

The process described above is easily done in the home kitchen with yummy results!   Let's reclaim sour cream!

You will need: heavy or light cream,  buttermilk, and a glass container with a lid.
Printable Recipe

Here I have two cups of cream.  (This is actually raw cream I was able to purchase at a local co-op.)
If you are using raw cream or non-homogenized milk, you might want to let the cream sit in a gravy separator for several hours.  The milk will sink to the bottom and then you can just pour it off.  (If any milk is left, it will make the sour cream a little lumpy.  I will explain later how to fix this.)  If you are using straight cream that you bought at the store, then skip this step.  Pour the cream into a clean glass jar that has a lid. 
Now we need to find a source of lactic acid.  The buttermilk you have in your fridge is a great source of lactic acid. 
You may not be able to see in this pic, but the first ingredient in my Lowfat Cultured Buttermilk is cultured low fat milk.  Cultured in this case means lactic acid.  I nearly always have buttermilk on hand, it's my secret weapon for lots of different recipes.  To sour our cream, we need to add some buttermilk to it.  For each cup of cream, you need one tablespoon of buttermilk.  So to the two cups of cream in my jar, I added 2 T. of buttermilk.

Stir it up, put the lid on it and store it on the kitchen counter overnight.
In the morning, you should have beautifully thickened sour cream.
The only thing to do now is put a lid on it, label it and put it in the fridge.
I have to admit that this morning when I went to open my container of sour cream it was lumpy and still liquidy. 
I realized that I didn't get all the milk out when I separated it the day before.  This is easily fixed.  Take a large strainer and line it with one layer of cheesecloth.  Pour the sour cream in the cheesecloth and let it sit for a while, giving it the occasional stir.  The liquid will drain out and leave you with the yummy sour cream you desire.
I ended up pouring off about a half a cup of liquid.  Next time, I'll make sure that I take the time to let the milk and cream fully separate.  I hope you get a chance to try this method.


Thursday, April 12, 2012

What we did with a prime rib roast

We had a bit of money left over in our food budget so I found myself perusing the meat section of our local grocery store.  Since it was a few days after Easter, there were a few high end cuts of meats on sale, like lamb.  I'm the only one in my family that likes lamb, so I headed over to where the expensive cuts of beef are.  I nearly never buy t-bones or strip steak, I try to keep the meat I buy under $3 a pound.  (That is harder and harder to do...that is why I'm trying to eat more vegetarian meals) I couldn't believe what I saw there....a USDA Prime Rib Roast.  It was a semi-boneless roast, which simply meant they'd taken two bones out of this four bone roast.  It was originally over $92 but was half off for $47.45.  That is still a lot of clams for 5 pounds of meat!
I'm not really sure about the grocery store's math skills.....

Since the extra cash in my wallet and the sale lined up, I bought it.  I was so excited.  One of my favorite things to get out-to-eat is a nice, rare piece of prime rib.  I really didn't have a plan on what to do with it when I got home.  Matt and I both researched recipes and Matt found this recipe for  herb crusted prime rib.  I made some adjustments...it called for fresh herbs and I only had dried.   Since dried herbs are more potent than fresh, I cut the quantities for the herbs in half.  I rubbed the roast all over with the paste and left it on the counter at room temperature for two hours.
Matt put it on the smoker until it reached 120 inside...nice and rare!  It took about 2 hours to reach the goal temperature.
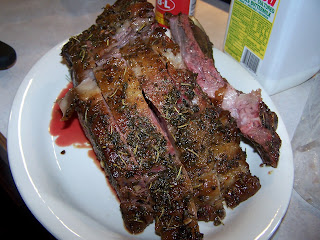
After Matt pulled it off the smoker, it rested for 30 minutes, covered in aluminum foil on the counter.  If you cut a piece of meat before it has time to properly rest, it will release all its juices and be dry.  That was a very, very long 30 minutes.  The internal temperature of the meat rose another 10 degrees.  It was time for slicing.  Matt sliced four steaks from this roast and then cut those steaks in half.  I mean, it is 100 calories an ounce for prime rib. 
This was before Matt cut the steaks in half.
The steaks were delicious!  Though probably not as tender as a restaurant because I didn't dry age the roast.  It was still quite the treat for us on a Wednesday night.  The best part is that we only ate half of the roast......can you say leftovers?????  YUM!

Monday, April 2, 2012

Southwestern Sweet Potato Black Bean Cakes with Chipotle Cream

I have been trying for a while to get my family to eat more vegetarian meals.  We are definitely carnivores at our house and most of the time my husband, Matt, just tolerates the meatless dishes.  His tagline when I ask him what he thinks of a new vegetarian dish is "This would be great with Italian sausage!"   BUT when he took a bite of this one, he stopped and looked at me and said, "This is REALLY good!"  He doesn't miss the meat at all here.  Even my kids eat this...though they skip the spicy-hot chipotle cream.  *UPDATE: I used baked sweet potatoes and found they made things a bit liquid-y.  If that happens and the cakes seem a bit wet, add enough regular bread crumbs (I used about 1/2 c. to 3/4 c.) to bring the cakes together a bit more before you fry them up. 

Sweet Potato Cakes:
click here for printable recipe 
(makes 8 patties- serves 4 adults @ 2 patties a serving)
2  large sweet potatoes, peeled and cubed in 1/2 inch cubes (about 6 cups)
1 (15 oz) can of black beans, drained and rinsed
1 T. chili powder
1 t. cumin
3/4 t. salt
1 c. panko bread crumbs
Chipotle Cream:
1/2 c. sour cream
1 chipotle chili canned in adobo sauce

Steam the cubed potatoes in a steamer basket until fork tender.  (You can also bake two large baked sweet potatoes whole, steaming is just faster.  If you bake them, it will take at least an hour at 400 degrees.)

While the sweet potatoes are steaming, drain and rinse your black beans.  Set aside 3/4 c. of black beans whole.  Take the rest of the black beans and mash them with a fork in a large bowl. 
Add the steamed sweet potatoes and then mash them with the same fork!
Add the reserved black beans and mix well.
Add the chili powder, cumin and salt.

Mix well.  In a small, shallow dish, place 1/3 c. panko and set aside.  In a large skillet, heat 1 T. of vegetable oil over med. heat.  Now, it is time to form the patties.   This is different from making meat patties.  There isn't much fat to keep the mixture from sticking to your hands.  I suggest getting your hands wet between forming each patty.  After wetting your hands, scoop out about 1/2 c. of the mixture.
Form a patty with your wet hands, and gently place in the shallow dish of panko.

Since your hands are still wet, you don't want to stick them in a bunch of panko bread crumbs.  They'll end up with as much crumbs as the patty!  Take a spoon and push the bread crumbs around the sides of the patty.
Sprinkle some bread crumbs over the patty.  Use your spoon to distribute them.
You can either use you hands here or a spatula to transfer to your preheated skillet. (Repeat with each patty, adding panko to the bottom of the shallow dish each time.)

It is likely that you have gotten some panko on your hands at this point.  Just go rinse it off and keep them wet to form the next patty.  You'll need to work in two batches.  I was able to get four patties in the skillet at a time. Cook each patty until a deep golden brown (about 3 or 4 minutes) on each side.   Use care as you flip the patties, they will not firm up like a meat patty will.  You may also have to add more oil as you brown them.

While these are cooking, it is time to assemble the chipotle cream.  Take one chipotle chili that was packed in adobo sauce and chop it finely.  Add to 1/2 c. of sour cream and set aside.  (If you want the sauce extra spicy, add a t. of adobo sauce.) 
Once your sweet potato cakes are done, serve them up immediately with a schmear of  the chipotle cream.
A serving (2 cakes) is 351 calories and 12 g of fiber!!!!!

Friday, March 30, 2012

How to get rid of stinky dish cloths....

Does this happen to y'all? 
A wadded up dish cloth in the sink....smelly and nasty?  Maybe it got left overnight under a dish, maybe one of your kids (or husband) mopped up a spill and didn't rinse it out well, or perhaps it was just used a day too long.  The mildew-y smell gets the better of it and off to the laundry it goes.  It gets washed and dried with your regular laundry and STILL smells funky!  This has happened to me often.  I ended up throwing away dish rags I thought were now useless.  A couple of days ago, I opened the linen drawer in The Teeny Kitchen That Could and was nearly knocked over with the funk.   I had JUST done laundry!  There must be a way to get these wash cloths clean and fresh.  I did a little research and a bit of thinking and came up with a way to get rid of the unpleasant smell.  It is simple and you probably have what you need right now to fix the problem! 

Place 1/2 to 3/4 c. of baking soda in a bucket or container that will hold a gallon of water.  Then add a gallon of HOT water.   Add your wash cloths, stir them up and then let them sit overnight.  In the morning, dump the entire thing in your washing machine and add detergent.  (Enough for a small load.)  Run it like you normally would.  Dry in your machine and voila! clean smelling rags.
I am just so pleased that I got rid of that nasty stink I had to share it with you all!  Please feel free to pass this one along to all your friends!

Tuesday, March 27, 2012

Cannellini Tuscan Bean Soup

HURRY!  Before it gets too warm, make this soup!  Actually, it is never too warm in the Smith house for soup.  We love it fall, winter, spring and summer.  But if you are one that only eats soup when it is cold, you might change your mind when you try this one.  It is sooo good.  I am not actually sure where I found this recipe.  I am sure that my husband, Matt,  probably sent it to me.  I wish I could give credit where credit is due, because this soup is fabulous!  Did I mention that it was easy too?  Good for those busy weeknights when you don't have a lot of time to prepare dinner.  Chop a few veggies, open a few cans....dinner!


I hadn't heard of cannellini beans until I tried this soup.  They are a white Italian kidney bean, similar in flavor to navy beans or Great northern beans.  They come canned or dried.  At first, I couldn't find them where we lived at the time, so the recipe didn't get made. A new grocery store opened up near us and they carried Bush's canned cannellini beans.  I bought the cans and made this soup one night.  YUM!  If you can't find cannellini beans where you are, just try using navy or Great northern beans.

Cannellini Tuscan Bean Soup:
Printable recipe
4 slices thick cut bacon, chopped
1 medium carrot, chopped
1 celery stalk, chopped
1 onion, chopped
4 garlic cloves, minced
4 - 15 oz. cans of cannellini beans, drained and rinsed
4 c. chicken stock
1/2 c. dry white wine
1 bay leaf
salt to taste

Topping:
2 T. olive oil
2 T. minced garlic
1/2 t. crushed red pepper
1/4 c. fresh basil, sliced
salt to taste

In a Dutch oven over medium high heat, cook bacon, carrot, onion and celery for about 5 to 7 minutes.  Don't get the bacon crispy...it will be blended into the soup.


 Add the garlic and cook for a minute more.


Now is the time to add your beans.
Add the chicken broth, wine, bay leaf and about 1 t. salt.  Cover and simmer for 20 to 25 minutes.  While this is simmering away, it is time to prep the topping.  In a small skillet, heat the olive oil over medium heat.  Add minced garlic, crushed red pepper and a pinch of salt until garlic is ever so slightly browned around the edges.  Take off the heat and add basil.  Stir it around until basil is wilted.
  I didn't have any fresh basil on hand so I subbed in 2 t. dried basil.  Set aside.

After the soup as finished simmering, whip out your immersion blender.
Place in the soup at a slight (slight!) angle and turn on.   If you leave it straight up and down, it will take forever for the soup to puree.  If you tilt it too much, you will be mad at me for suggesting it while you wipe down your walls that are covered in sticky, hot soup!
Correct angle
Straight up and down....wrong!
If you don't have an immersion blender...don't despair!  You can put the soup either in your blender or a food processor.  But please keep in mind that hot liquids need more space to blend than cold ones.  If you fill the blender or food processor past half full....again, you will be mad at me while you wipe down walls covered in sticky, hot soup.  So use caution!  After you've blended your soup, it should be completely smooth.  Taste it to adjust your seasoning at this time.
Add a pinch of the topping to each bowl and serve with a nice salad and some crusty bread!
Some other notes before you get started.  I didn't use canned beans when I did this recipe this time.  I have a wonderful access to dried cannellini beans so I used a pound of dried beans.   I did the basic overnight soak of the beans and then cooked them for 2 hrs.  before proceeding with the rest of the recipe.  You also do not have to blend the soup, but I feel like you will lose some in the texture if you do not.  Lastly, if you do not want to use wine, substitute 1/2 c. chicken stock.  I already mentioned my substitution of the dried basil for fresh.    And here is a bonus for reading to the end:  One cup is only 157 calories and has 9.4 grams of fiber!  Good for you and delicious!

Friday, March 23, 2012

Butternut Squash and Sausage Breakfast Hash- Low Carb and Delicious!

A year or so ago, I got serious about losing weight.  I was desperate...I was at my highest non-pregnant weight.  So I investigated different diets and found one that I thought would work.  It was an elimination diet that started off severely limiting carbs.  We ended up hating the diet and not losing any weight, but something good DID come out of it.  This recipe for breakfast hash. I had a flash of inspiration and thought I'd throw together butternut squash, red bell peppers and turkey sausage.  It was sooo good.  The best part is that a serving is 225 calories a pop!  It also uses red bell peppers and butternut squash...powerhouses nutrient wise.  With a little prep the night before, this will be come a staple at your house in the morning!

Ingredients:
1 lb. turkey sausage
1 small butternut squash, about 3 c. diced (1/2 inch or smaller)
1 red bell pepper, chopped
1 small onion, chopped
2 garlic cloves, minced
1/2 t. sage (or 3 fresh sage leaves, minced)
1/2 t. thyme
salt and pepper to taste (I used Cavender's Greek Seasoning)

*For fast prep in the morning, peel and dice your squash and bell pepper the night before.  Use a vegetable peeler to remove the skin of the butternut squash.  Don't chop up the onions or garlic for overnight storage, it makes them bitter.

In a large skillet over med. high heat, brown your turkey sausage. (While the sausage cooks, dice up the onion and garlic.)

After it is completely browned, move it to a plate and keep warm.  Add the onions, bell pepper and butternut squash to the pan.
Add the sage, thyme, salt and pepper.  Fresh sage and thyme are best but it is still delicious with the dried stuff.

Cook the veggies until the butternut squash is soft and has taken on some color, about 10 to 15 minutes.  You may need to add a bit of water to keep the veg from sticking.  (I had to add 1/2 c. twice during this cooking)  Keep in mind, the smaller the dice on the squash the faster it will cook.  Add the minced garlic a couple minutes before the cook time is over.  After the veggies are all cooked, add the turkey sausage to the party.

Mix well and heat through. Check seasoning and adjust if needed.
This makes 4 servings.  It is one of my favorite things to have for breakfast (along with my faithful cuppa coffee!), I find that it keeps me fuller longer.  Did I mention how yummy it is too?  I hope you find it as satisfying as we have.

Sunday, March 4, 2012

Reclaiming Granola! Clumpy granola at it best.


I am a granola junkie....there is something about the crunchy, sweet oatmeal taste that is irresistible.  I love it for breakfast with skim milk.  I will eat it dry as a snack throughout the day and then for dessert, I will have it with whole milk or even cream!  I will eat it with yogurt......
"And I would eat them in a boat!
And I would eat them with a goat...
And I will eat them in the rain.
And in the dark. And on a train.
And in a car. And in a tree.
They are so good so good you see!"

I seem to recall begging my mom to buy granola in the store when I was a kid.  As an adult, I can't believe how expensive it is.  Have you looked at some of the designer brands of granola???  It's highway robbery! You know that means that I'm definitely going to try to reclaim it and make it my own.

I also craved some seriously custom granola, with no dried fruit (though you could certainly add some) and without puffed rice.  When I started making my own, I was disappointed with the lack of clumps...it was just individual pieces of oatmeal and nuts.  I wanted clumpy clusters in my granola.  I searched the internet for "clumpy granola" and found a recipe that gave me small clusters, better than none, but I wanted more.  The flavor, though, in that recipe was awesome!  I tried adding water to make it moister in the hopes that, when it baked, it would harden and make clumps. I stirred it like the recipe told me to.  Nope.  Still not clumpy like I wanted.  I continued using that recipe because it tasted so good.  A month or so ago I got my issue of Cook's Illustrated and saw a headline for Super Crunchy Granola.  I was so excited to try it.  It advocated using more oil to make it clumpy and not stirring it.  Aha!  I tried their recipe...it was an improvement on texture but not taste.  And still, not enough clumps.  I had a burst of inspiration and thought I'd take the recipe that tasted so good, Cook's Illustrated's method and just a little more oil and combine them.  I couldn't wait for this batch to come out of the oven.  It was PERFECT!  I could lift up the granola in one sheet and could break off pieces.  I'll have you know that a full third of the granola was gone before that day was over.  Everyone kept coming back for more.

Now before I start, let me give acknowledgement to the shoulders that I stood on to find my granola eutopia:  Alton Brown, Anna from cookie madness and Adam Ried from Cook's Illustrated.

Tools needed:  A lined baking sheet (lined with a Silpat or parchment paper), a metal spatula, 

Super Crunchy, Clumpy Granola:
3 c. old-fashioned oats
1 c. raw, slivered almonds
1 c. shredded sweetened coconut
1/2 to 3/4 t. salt (I used the larger amount...the salty and sweet combo is my fav!)
1/3 c. vegetable oil
1/4 c. maple syrup
4 T. brown sugar
2 T. honey
1 t. vanilla
1 c. dried fruit (opt.) 

Preheat oven to 425 degrees.  In a large bowl, combine oats, almonds, coconut and salt.

 In a small, microwaveable bowl, combine brown sugar, maple syrup, honey and oil.  If the combination of the brown sugar, syrup and honey seems like a bit of overkill, I have tried it with just one sweetener and the results are not the same.  The taste was flat.  The combination of the sugars and the salt is sooo good.  Heat in the microwave for one minute.  This just heats up the sugar so it dissolves and coats the oatmeal better.  Add the vanilla to the sugar mixture.  Pour this over your oats and nuts and toss to coat.
 
Turn out onto a Silpat lined baking sheet. With a metal spatula, press down hard on the granola.  This encourages good clumps!
Place in the oven for 15 min. then lower the heat to 250 and bake for another 30 or 40 minutes or until the edges are a golden brown.
 Let the granola cool completely.  You should be able to pick up nearly the entire sheet of granola after it cools.  Break it into bite sized pieces and then store in an airtight container.  If you want to add dried fruit, add about a cup now.
One of the best things about granola is that you can really do what you want with it.  I like almonds, but you can add pecans or cashews.  If you don't care for coconut, leave it out.  I'm going to try adding ground flax seed next time.  Certainly, sunflower seeds or sesame seeds would be in order.  This recipe also doubles fabulously....the container above is filled with a double batch.  If you do double it, make sure that you use another baking sheet and divide the large batch in two.  I encourage you to play with different combinations of nuts and flavors in YOUR granola!  Happy crunching!