"Reclaiming Homemade in a Small Space"

Wednesday, April 18, 2012

Reclaiming Sour Cream

Let's reclaim sour cream, shall we?

You might be thinking, "Why would I want to make my own sour cream?"  It is readily available in the grocery stores for not a whole lot of cash.  There are a few reasons why you might consider making your own.   One reason is many commercial dairies add guar gum or gelatine to make the sour cream even thicker or things to make it last longer.  Or, you might have bought heavy cream for a recipe and have 1/2 c. left over.  It just sits in your fridge because you aren't sure what to do with it. 

I started making my own sour cream on a regular basis when I started buying pasteurized, non-homogenized milk.  The cream rises to the top and then I can skim it off and make sour cream. This is not only tasier!, but also eco-friendlier.  I'm not wasting money on packaging or filling up landfills with plastic containers.  (Food for thought, it still takes 5 years for a cardboard milk container to biodegrade.)  Here's a bonus too:  it is SUPER easy to make!

If the thought of souring your own cream just seems a little gross, I ask you, how do you think commercial dairies do it?  We get separated from the process and don't realize that what is done in a huge factory can be done in your own kitchen.  Our ancestors made sour cream by letting the fresh raw cream just sit out until it reach the desired degree of sourness/thickness. Here is how eHow.com describes the modern, commercial sour cream development.

"The pasteurized cream is inoculated with bacteria that come from lactic acid. The inoculated cream is allowed to ripen for 14 to 16 hours at 72 degrees F. During this time, the bacteria grows, fermenting the cream in the process. This process is also called "souring," which is how sour cream got its name. Souring makes the cream thick and sour. Then the cream is chilled for 12 to 48 hours. Once the cream is soured to the desired level, it is pasteurized to kill the bacteria.

The process described above is easily done in the home kitchen with yummy results!   Let's reclaim sour cream!

You will need: heavy or light cream,  buttermilk, and a glass container with a lid.
Printable Recipe

Here I have two cups of cream.  (This is actually raw cream I was able to purchase at a local co-op.)
If you are using raw cream or non-homogenized milk, you might want to let the cream sit in a gravy separator for several hours.  The milk will sink to the bottom and then you can just pour it off.  (If any milk is left, it will make the sour cream a little lumpy.  I will explain later how to fix this.)  If you are using straight cream that you bought at the store, then skip this step.  Pour the cream into a clean glass jar that has a lid. 
Now we need to find a source of lactic acid.  The buttermilk you have in your fridge is a great source of lactic acid. 
You may not be able to see in this pic, but the first ingredient in my Lowfat Cultured Buttermilk is cultured low fat milk.  Cultured in this case means lactic acid.  I nearly always have buttermilk on hand, it's my secret weapon for lots of different recipes.  To sour our cream, we need to add some buttermilk to it.  For each cup of cream, you need one tablespoon of buttermilk.  So to the two cups of cream in my jar, I added 2 T. of buttermilk.

Stir it up, put the lid on it and store it on the kitchen counter overnight.
In the morning, you should have beautifully thickened sour cream.
The only thing to do now is put a lid on it, label it and put it in the fridge.
I have to admit that this morning when I went to open my container of sour cream it was lumpy and still liquidy. 
I realized that I didn't get all the milk out when I separated it the day before.  This is easily fixed.  Take a large strainer and line it with one layer of cheesecloth.  Pour the sour cream in the cheesecloth and let it sit for a while, giving it the occasional stir.  The liquid will drain out and leave you with the yummy sour cream you desire.
I ended up pouring off about a half a cup of liquid.  Next time, I'll make sure that I take the time to let the milk and cream fully separate.  I hope you get a chance to try this method.


Thursday, April 12, 2012

What we did with a prime rib roast

We had a bit of money left over in our food budget so I found myself perusing the meat section of our local grocery store.  Since it was a few days after Easter, there were a few high end cuts of meats on sale, like lamb.  I'm the only one in my family that likes lamb, so I headed over to where the expensive cuts of beef are.  I nearly never buy t-bones or strip steak, I try to keep the meat I buy under $3 a pound.  (That is harder and harder to do...that is why I'm trying to eat more vegetarian meals) I couldn't believe what I saw there....a USDA Prime Rib Roast.  It was a semi-boneless roast, which simply meant they'd taken two bones out of this four bone roast.  It was originally over $92 but was half off for $47.45.  That is still a lot of clams for 5 pounds of meat!
I'm not really sure about the grocery store's math skills.....

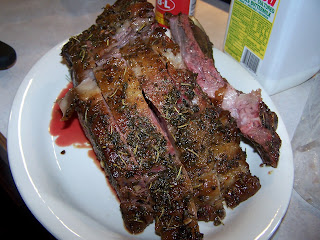
Since the extra cash in my wallet and the sale lined up, I bought it.  I was so excited.  One of my favorite things to get out-to-eat is a nice, rare piece of prime rib.  I really didn't have a plan on what to do with it when I got home.  Matt and I both researched recipes and Matt found this recipe for  herb crusted prime rib.  I made some adjustments...it called for fresh herbs and I only had dried.   Since dried herbs are more potent than fresh, I cut the quantities for the herbs in half.  I rubbed the roast all over with the paste and left it on the counter at room temperature for two hours.
Matt put it on the smoker until it reached 120 inside...nice and rare!  It took about 2 hours to reach the goal temperature.
After Matt pulled it off the smoker, it rested for 30 minutes, covered in aluminum foil on the counter.  If you cut a piece of meat before it has time to properly rest, it will release all its juices and be dry.  That was a very, very long 30 minutes.  The internal temperature of the meat rose another 10 degrees.  It was time for slicing.  Matt sliced four steaks from this roast and then cut those steaks in half.  I mean, it is 100 calories an ounce for prime rib. 
This was before Matt cut the steaks in half.
The steaks were delicious!  Though probably not as tender as a restaurant because I didn't dry age the roast.  It was still quite the treat for us on a Wednesday night.  The best part is that we only ate half of the roast......can you say leftovers?????  YUM!

Monday, April 2, 2012

Southwestern Sweet Potato Black Bean Cakes with Chipotle Cream

I have been trying for a while to get my family to eat more vegetarian meals.  We are definitely carnivores at our house and most of the time my husband, Matt, just tolerates the meatless dishes.  His tagline when I ask him what he thinks of a new vegetarian dish is "This would be great with Italian sausage!"   BUT when he took a bite of this one, he stopped and looked at me and said, "This is REALLY good!"  He doesn't miss the meat at all here.  Even my kids eat this...though they skip the spicy-hot chipotle cream.  *UPDATE: I used baked sweet potatoes and found they made things a bit liquid-y.  If that happens and the cakes seem a bit wet, add enough regular bread crumbs (I used about 1/2 c. to 3/4 c.) to bring the cakes together a bit more before you fry them up. 

Sweet Potato Cakes:
click here for printable recipe 
(makes 8 patties- serves 4 adults @ 2 patties a serving)
2  large sweet potatoes, peeled and cubed in 1/2 inch cubes (about 6 cups)
1 (15 oz) can of black beans, drained and rinsed
1 T. chili powder
1 t. cumin
3/4 t. salt
1 c. panko bread crumbs
Chipotle Cream:
1/2 c. sour cream
1 chipotle chili canned in adobo sauce

Steam the cubed potatoes in a steamer basket until fork tender.  (You can also bake two large baked sweet potatoes whole, steaming is just faster.  If you bake them, it will take at least an hour at 400 degrees.)

While the sweet potatoes are steaming, drain and rinse your black beans.  Set aside 3/4 c. of black beans whole.  Take the rest of the black beans and mash them with a fork in a large bowl. 
Add the steamed sweet potatoes and then mash them with the same fork!
Add the reserved black beans and mix well.
Add the chili powder, cumin and salt.

Mix well.  In a small, shallow dish, place 1/3 c. panko and set aside.  In a large skillet, heat 1 T. of vegetable oil over med. heat.  Now, it is time to form the patties.   This is different from making meat patties.  There isn't much fat to keep the mixture from sticking to your hands.  I suggest getting your hands wet between forming each patty.  After wetting your hands, scoop out about 1/2 c. of the mixture.
Form a patty with your wet hands, and gently place in the shallow dish of panko.

Since your hands are still wet, you don't want to stick them in a bunch of panko bread crumbs.  They'll end up with as much crumbs as the patty!  Take a spoon and push the bread crumbs around the sides of the patty.
Sprinkle some bread crumbs over the patty.  Use your spoon to distribute them.
You can either use you hands here or a spatula to transfer to your preheated skillet. (Repeat with each patty, adding panko to the bottom of the shallow dish each time.)

It is likely that you have gotten some panko on your hands at this point.  Just go rinse it off and keep them wet to form the next patty.  You'll need to work in two batches.  I was able to get four patties in the skillet at a time. Cook each patty until a deep golden brown (about 3 or 4 minutes) on each side.   Use care as you flip the patties, they will not firm up like a meat patty will.  You may also have to add more oil as you brown them.

While these are cooking, it is time to assemble the chipotle cream.  Take one chipotle chili that was packed in adobo sauce and chop it finely.  Add to 1/2 c. of sour cream and set aside.  (If you want the sauce extra spicy, add a t. of adobo sauce.) 
Once your sweet potato cakes are done, serve them up immediately with a schmear of  the chipotle cream.
A serving (2 cakes) is 351 calories and 12 g of fiber!!!!!